We have for some time been using google maps to plan cruising routes and record trips to be viewed on our mobile devices. Some of our crew have suggested sorting out integration with Viewranger as it would be nice for the canal features and points of interest (Pubs, Shops etc.) to be overlaid on Viewranger’s OS maps. In addition, integrating with Viewranger will mean that all information is loaded into your device and removes the need for an internet connect while cruising which is needed when using Google Maps.
Viewranger is useful when cruising however for trip planning we would still recommend the excellent Canal Planner here.
Here are the resources you need to use Canal data with Viewranger, on this page you fill find:
A file of Icons – these need to be installed as icons within Viewranger’s icon library on your device. You need to do this on each device you will use to view the other POI and Route files on this page.
POI files – these files provide the location and information about canal features and other points of interest. Using point of interest rather than waypoints enables a wider range information to be stored for each feature, such as URLs for pubs and tourist features. POI files are provided organised by canal, region, or collection of routes.
Route files – these show the route of the canals for a particular route or canal ring.
More tips on loading and viewing these various files in Viewranger are included below.
ICON files
You will need all the icons in the zip file attached here VR POI Icons. Download this file to the PC or Mac OS computer you are going to use to transfer the Icons to your Viewranger mobile device.
These need to be loaded into your mobile device (and on each device you intend to use with the POI files). I have found the easiest way to do this seems to be by using the Wi-Fi access feature in Viewranger.
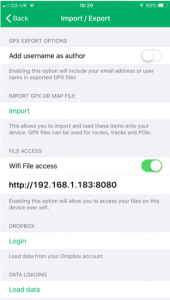 In Viewranger navigate to (…) -> Import / Export -> and enable Wi-Fi access on the page as shown on the right here.
- On a PC or a MAC OS device use a browser to view the page at the URL and port number shown in Viewranger. You should see a page looking like this:
- Select the ‘Icons’ sub-page which which is not very informative, scrolling to the bottom of the page you will find this:
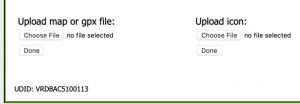
- Clicking on the [choose file] button, under Icon:, will open a finder on your computer which will allow you to select an Icon for upload. Once you have selected a file and confirmed the selection in the finder you should then see the selected file name on the web page like this:

- Clicking on the [Done] button will upload the file to the Icon library on your device. Note the text on the [Done] button may be different depending on the version of Viewranger and the device you are connected to.
- Repeat this process for each individual file in the Icon collection in the Icon Zip file.
If you want to check what icons you have uploaded you can do this in Viewranger by:
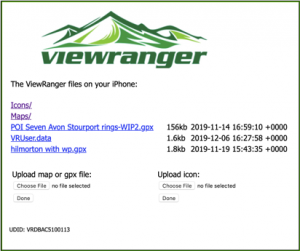
- Navigating in Viewranger to (…) -> Import / Export and select ‘Documents’ at the bottom of the Import / Export page.
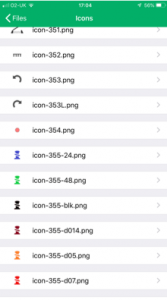 On the page of file types displayed Select ‘Icons’, scrolling down the list of Icons you should find the Icons that have been uploaded into the App. As in the example shown here:
POI files
POIs and Route files can be loaded directly into Viewranger on you mobile device from this website. Alternatively if your mobile device has access to a supported cloud-based file storage service such as Dropbox, OneDrive, Google Drive, Apple iCloud storage etc. you can import the files into the Viewranger file library on you device. POI files contain the description, Location and Icon name for multiple Points Of Interest which are then plotted as an overlay on the Viewranger map you are viewing. It is worth noting the following points:
- Viewranger will either display all the POIs you have imported, or none of them if you hide the POIs.
- POIs can be imported from multiple files, but they are not grouped or identified by the files they were loaded from.
- Imported POIs can either be deleted individually or you can delete all of them, there is no option to delete a particular sub set of the POIs.
- When you import a POI file from a file storage service such as OnDrive the file is downloaded and added to the Viewranger files on your device, the POIs can be re-imported from the stored POI file without the need for internet access.
- The conclusion of these points is that you can easily delete all displayed POIs from Viewranger and then reload selected sets of POIs from one or more POI files either directly from the Internet or from those stored on your mobile device.
The following instructions take you through the necessary steps:
(All screen shots and testing of these steps were done using version of iOS/iPadOS/Viewranger current in December 2019)
POI files available for direct loading into Viewranger or for download are listed here:
- POI Four Counties Ring (GPX)
- POI Severn, Avon and Stourbridge Rings (GPX)
- POI Leicester Ring (GPX)
- POI Oxford Canal (GPX)
- POI Grand union Canal (GPX)
 On iPhone
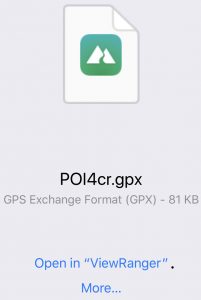
These are direct links to GPX files, on an iPhone there is a good chance, dependent on the version of iOS/iPadOS you are using, that when you click on these links the iPhone will offer to load these directly into Viewranger with a screen that looks like this:
Click on “Open in Viewranger”, Viewranger will confirm that the file contains POIs and ask for verification that you want to import them:

Once confirmed, the POIs will be displayed on the device Viewranger map after a short delay.
Note also, if you load a GPX file twice you will duplicate all the POIs in the file, but this does not matter as they will directly overlay each other and will all be deleted together if you delete all POI data.
If this does not work then you can try the import approaches described below.
On iPad (and some iPhone iOS versions)
| Step | Appearance |
|---|---|
| On the iPad clicking on a link will display a download option like this: |  |
| When downloaded the file is saved to your iPad, it appears in the “Files” App ( This app from Apple is available in the App Store if you do not have it on your device.) |  |
| In the files app select the ‘downloads’ folder and select the file that has been downloaded. (The location of the downloads folder may be either on the iCloud Drive or on the Phone depending on your use of iCloud.) | 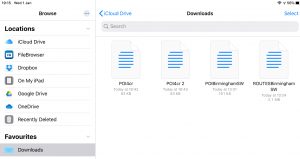 |
| The following options appear at the bottom of the screen | [Share – Duplicate – Move – Delete – More] |
| Follow the [Share] option which then has a [More] option: |  |
| This will open list of applications the file could be opened by including Viewranger: |  |
| Viewranger will confirm that the file contains POIs and ask for verification that you want to import them. | |
Once confirmed, the POIs will be displayed on the device Viewranger map after a short delay.
Importing files to the device Viewranger library
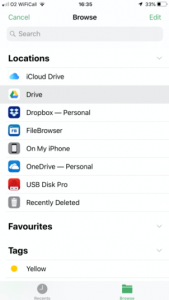
Instead of loading the GPX information directly from the website it is possible to import the files into the Viewranger library on your device. This has the advantage that if you want to delete all the POIs or Routes displayed, you can reload them from the files stored in the Viewranger library without an internet connection. On iPhone and iPad, GPX files can be either be downloaded to the device or transferred via a cloud based shared file location such as MS Onedrive, Dropbox, Google Drive etc.. In this case it is necessary to make sure your mobile device has the app installed to access the shared storage and that you are logged into to access the storage. The advantage of using a shared file location is that the POI and Route files can then easily be managed using your PC (or MAC), in either case the files can be seen using the “Files” app on your device.
To import files from the device file download directory or from a shared storage area, navigate to (…) -> Import / Export -> and select ‘Import’ in Viewranger. These two steps are illustrated here:

Browse in Viewranger to the location of the file, either in the download directory or shared storage location, and select the file. Viewranger will confirm the contents of the file (POIs or Routes) and ask for the import to be confirmed.
The side effect of importing POIs or Routes in this way is that the file will also be imported into Viewranger. To check what files you have uploaded you can do this in Viewranger navigating to (…) -> Import / Export and select ‘Documents’ at the bottom of the Import / Export page.
Selecting any of the files in this Viewranger document list will provide an option to re-import the file contents into the active Viewranger POIs or Routes. Thus if you delete all active POIs or Routes you can then reload just those you wish to be active in Viewranger for your trip.
ROUTE Files
In the same way as POI files, GPX Route files can be opened directly in Viewranger or by importing them into the Viewranger library on your device.
The Canal route information provided in the following files may include individual sub-routes which include side arms, alternative routes, and the different canals to navigate in a ring. If you load a file you may therefore need to delete (or hide) a number separate routes in Viewranger if you no longer want the information, or if you want to delete an older version and load a newer version of the route data.
Note also that if you load a file twice (or if two different files include the same canal sections) routes will be duplicated in the device. this can cause confusion when editing the appearance of routes as described in the Hints and Tips section below.
- ROUTE Four Counties Ring (GPX)
- ROUTES Severn, Avon and Stourbridge Rings (GPX)
- ROUTES Leicester Ring (GPX)
- ROUTES Grand Union Canal (GPX)
- ROUTES South Oxford Canal (GPX)
These are direct links to GPX files, there is a good chance, dependent on the version of iOS/iPadOS you are using, that when you click on any of these links you device will offer to load these directly into Viewranger with a screen that looks like this:
If this does not work then you can try the approach described in the section above on Importing files to the device Viewranger library.
Hints & Tips
The following hints and tips describe how the information included in POIs and routes can be seen in Viewranger and ways to improve the appearance in the map overlay.
POI and Route information
Selecting a POI on the Viewranger map will change the menu to include a ‘details’ option  Information may include:
- Nicholson pages for the feature
- A URL to further information on the internet (Internet access required)
- Details of locks and distances between junctions
Note that selecting POIs directly on a route can be difficult on the map while you have routes visible. Hiding all routes while trying to view POI information can be useful. Also there seems to be no way of searching for a specific POI.
Hiding or deleting Routes or POIs
- Routes can be hidden (or shown) in the following menu (…) -> Help & Feedback -> Route Options -> [Hide all Routes].
- To delete all routes in the following menu (…) -> Help & Feedback -> Route Options -> [Delete all Routes].
- Routes can be deleted individually by selecting a route on the map then in the route ‘more’ menu which appears as (…) select [Delete route].
- POIs can be deleted, hidden and shown in the menu (…) -> Points of Interest -> Edit -> [Delete, Hide or Show POIs]
- POIs can be deleted individually in the menu (…) -> Points of interest -> Select POI -> Scroll to bottom of page and select [Advanced] -> [Delete]
Setting display styles for routes, and tunnels
There does not appear to be a way to configure the styles used to display each route in the original imported GPX files. It is therefore useful to edit the appearance of each route in Viewranger:
- Select a route on the map
- Select the route ‘more’ menu which appears as (…)
- Select “properties”
Suggested changes are:
- Switch off arrows for all routes.
- Change tunnels to be displayed in yellow and increase the tunnel line width to maximum
 Note if you switch off arrows on a route and see something similar to the following, with a selected route and unselected arrows:
This is an indication that you have two copies of the route visible, one copy of the route may be deleted.
Display route distances
It can be useful display distance along a route which is done in the following menu (…) -> Display Preferences -> Route Distance Markers.
Reversing a route
When displaying route distance markers it can be useful to reverse the marker order by changing the route direction:
- Select a route on the map
- Select the route ‘more’ menu which appears as (…)
- Select reverse route
Waypoint information
It would be possible to change some POIs, which are directly on the route (for example locks), to be waypoints. However we have not done this as POIs are able to store more details and Waypoint are harder to select individually on the map.